

Social media surrounds us, so it’s not unusual for applications to require some kind of social media integration. The most common issigning in with Facebook, Twitter, or another service. Users expect to be able to log in with different social accounts. So, applications meet these expectations by offering external login options.
Let’s take a look at this functionality and investigate how to merge users’ accounts – specifically, we’ll consider the situation when people use several methods to log in.
Think about what happens when a user logs in with Facebook, uses the app, and then comes back some weeks later. By now, they’ve forgotten that they logged in with Facebook, so they sign up with their Github account. The application’s database will now have to store two accounts for a single user.
What we need is the ability to 1) merge existing user accounts, and 2) add different external social logins to a current account. In this article, we’ll look at two approaches to this and the implementation of one solution. In particular, we’ll consider:
- Possible approaches to merging external logins
- Potential problems of trying to merge accounts
- How Stack Overflow handles multiple accounts
- Implementing this functionality in an app. This will allow users to create a 'regular' account (i.e. an account with our app that is authenticated by the user’s email and password), but they can also log in with external providers. We’ll also look at the database design and how merging accounts works. You can grab the application code from Github.
If you want details about the OAuth 2.0 protocol and how social logins can be implemented in Python, take a look at my previous article, Implementing the 'Login with Facebook' Button.
Possible Approaches to the Multiple Login Problem
There are three options you can use when you’re dealing with multiple logins. Really, though, there are only three solutions:
- Ignore the problem and let the user have multiple accounts.
- Let users merge their accounts. The application offers the user an [add external login] button, which lets them connect external accounts to their regular account. This is probably the best way to allow users to connect their accounts.
- Have the application identify duplicate accounts and prompt the user to connect them. This only works in some cases; finding usable account data can be hard. Using email addresses to merge accounts isn’t fail-proof because some social providers don’t share email information. Plus, this method requires inspecting the data retrieved from the social media provider and seeing how it can be changed.
Potential Problems with Merging Accounts
There are at least two notable problems with merging multiple accounts. Before we embark on implementing an account-merge functionality in our app, we have to consider the following:
Can we connect existing accounts with their content?
The content related to different user accounts isn’t necessarily easy to merge. It depends on the type of services our application provides.
Should we rely on automatic account merges based on email address?
Social providers don’t always share the most merge-friendly data with apps. For instance, Twitter doesn’t share the user’s email. Email addresses, as unique names based on what each user authenticates, are hard to fake. Unfortunately, users can use different emails for different accounts. They can also change the email associated with their social media account. (Reddit, Facebook, LinkedIn, and Pinterest all allow users to change or remove email addresses.) The truth is that it’s impossible to use this credential to automatically connect social accounts. And there is no guarantee that all relevant accounts have been merged.
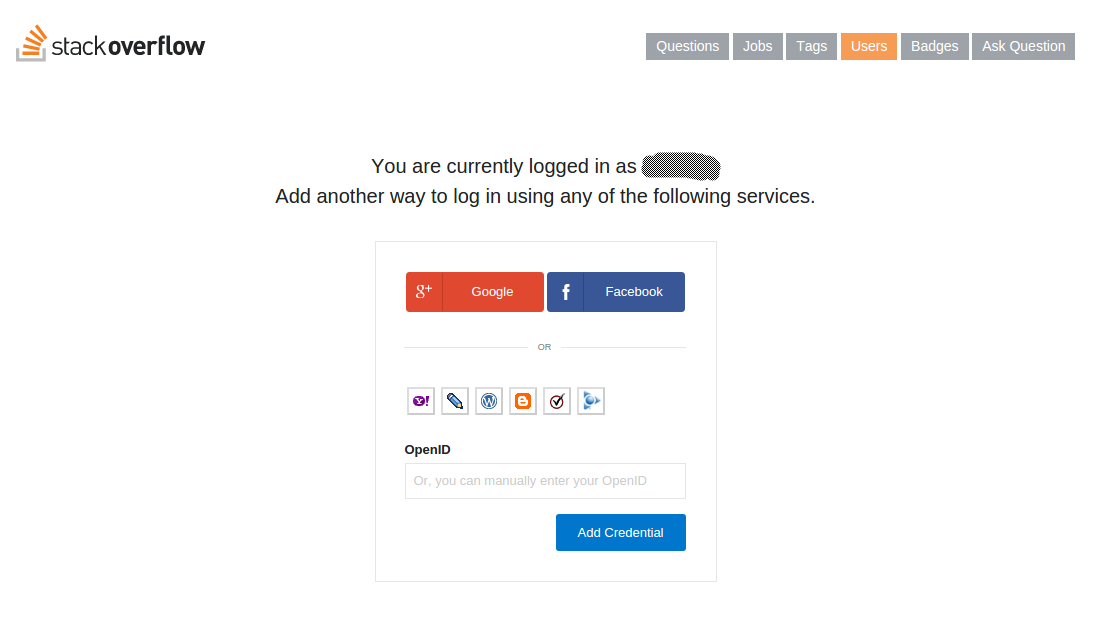
How Does Stack Overflow Solve Multiple Accounts?
Stack Overflow uses the second of our three options – letting users merge their accounts. Indeed, this website has a nice way to create and persist only one account if a user decides to employ multiple ways to log in.
Stack Overflow provides the merge option in the Edit Profile & Settings page. Here, users can manage their standard account info as well as their logins. Their list of logins as well as the possibility to add others is available under My Logins. After the user adds their additional login credentials, one account will be loaded regardless of which service they use to sign in.

Implementing a Solution to Merging Accounts
For testing purposes, I created a prototype Python web application that will be similar to Stack Overflow’s way of merging user accounts. It will enable the user to:
-
Create an account in the app
-
Log in via a created account or other services (Facebook, Google, LinkedIn, Github)

-
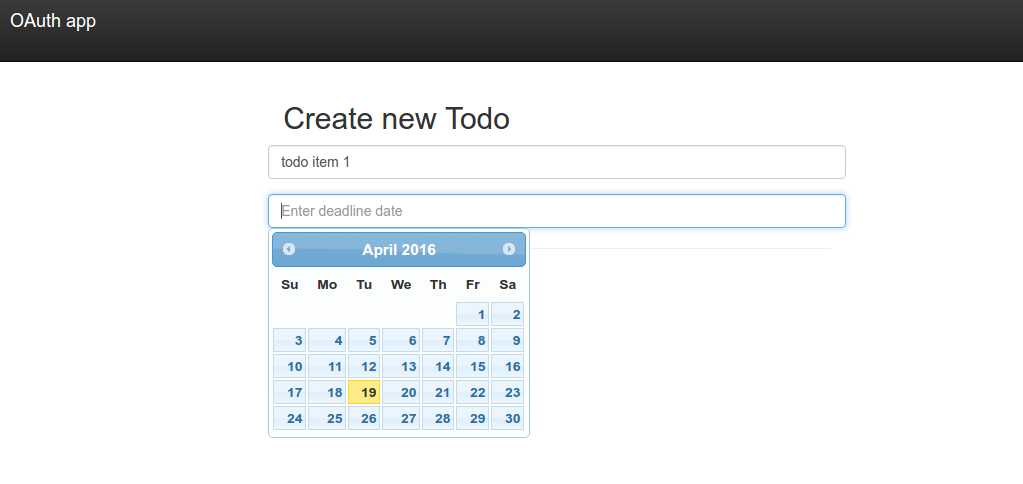
Add some content that is associated with this account. In this case, it is a list of todo items.
-
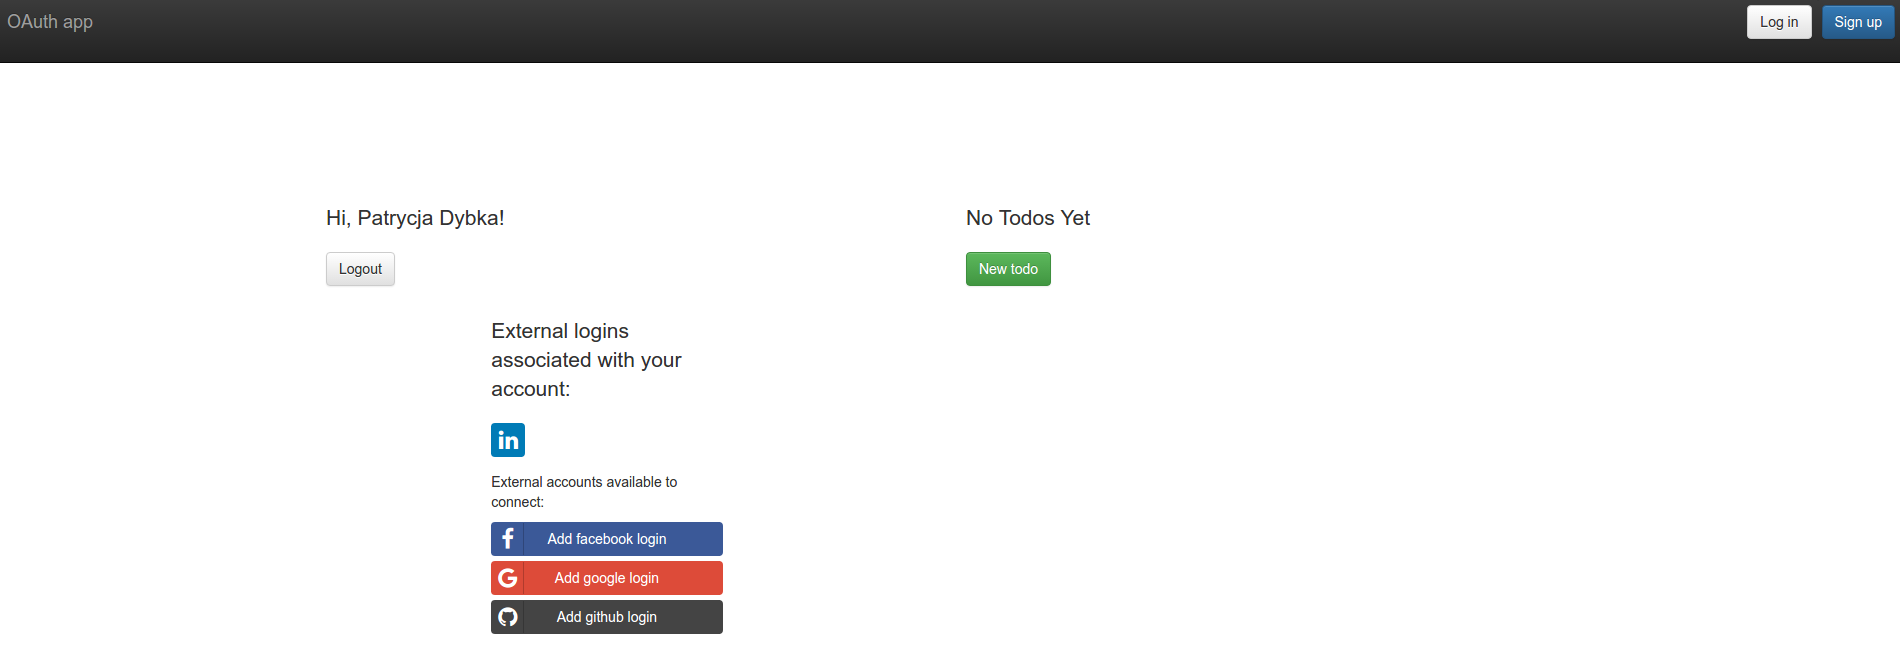
Connect other social media accounts. When logged in, the user can manually add other social accounts to their profile. Once these accounts are added, the same user account will be loaded no matter which login is used.
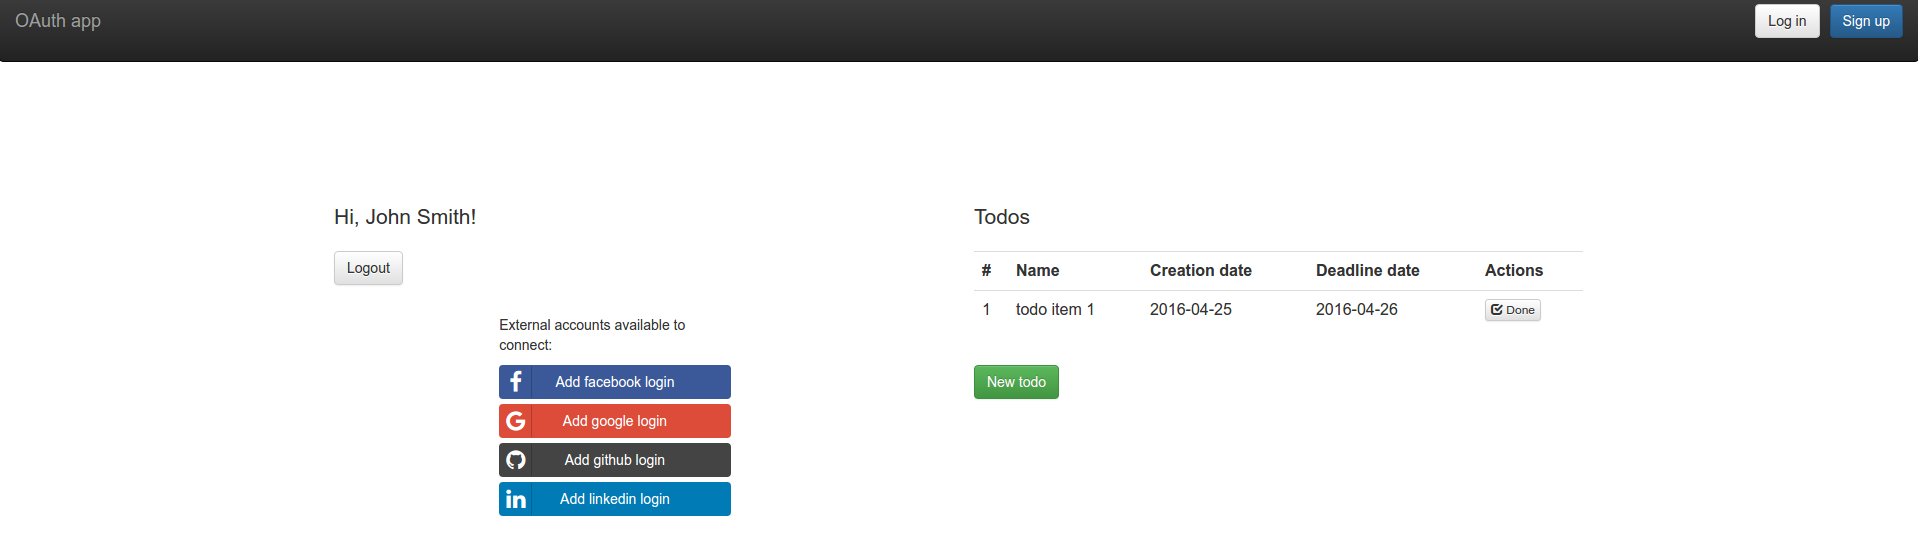
Below, we can see John Smith’s screen after he has added Facebook and Google to his external services:

The application also allows existing accounts and their associated content to merge. So, let’s log out of the John Smith account and create a different account using his Facebook login. While we’re logged in under Facebook, let’s add some todo items to his account. Log out again, then log in using John’s Smith’s regular account info. As you see, the todo items from both accounts are shown.
External Login Providers and Retrieved User Data:
The prototype app provides four external login services, but of course you can offer more.
You may choose any of the providers listed here. I’ve picked four of the most popular ways to log in: Facebook, Github, Google and LinkedIn. For building the external login flow, I’ve used the rauth Python library.
I’ll start with presenting some key information about each login provider and the user data they share. Each offers tutorials about using OAuth 2.0 to access their API. Here are the official sites for the ones I’ve used:
Google:
Facebook:
LinkedIn:
Github:
Each provider limits applications’ access to user data. This is presented in the form of scopes i.e. profile data, email addresses, age ranges, etc. In other words, the defined scope gives application access to a specific set of data. To check available scopes, visit the links below:
I don’t need to store all the user’s data in the application database. I’ll limit it as described in the table below, and I’ll store the pertinent results in the database’s user_external_login table.
| Name | Retrieved user data | OAuth Protocol Version | ||||||
|---|---|---|---|---|---|---|---|---|
| Scope | External ID | First Name | Last Name | Name | Login Name | |||
| public_scope, email | + | + | + | + | Merged first and last name | - | 2.0 | |
| profile, email | + | + | + | + | + | - | 2.0 | |
| r_basicprofile, r_emailaddress | + | + | + | + | + | - | 2.0 | |
| Github | user | + | If set as public | Can be split from name field | + | + | 2.0 | |
Database Design:
To test this functionality in the prototype app, I came up with the design shown here:
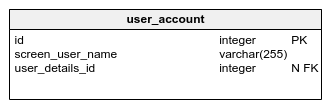
Let’s discuss the content of each table, starting with the user_details table.
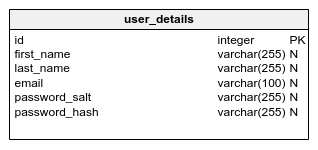
This table stores data authentication from the user registration form gathered during the creation of a new regular account.
The user_external_login table stores data retrieved from users’ social accounts.

In particular, the user_external_logins table stores:
- The
external_user_idretrieved by OAuth from the user’s data. - A foreign key to the appropriate record in the
external_authentication_providertable. - A foreign key to the appropriate record in the
user_accounttable
The user_account table stores the user name displayed in the application. A record is created at the same time an account is created, either via social providers or with the app’s [sign up] button. The user_external_login table references the appropriate record in this table. Should the user sign up for a regular account rather than using an external login, the user_details_id column contains the appropriate value from the user_details table.
Async_operation is a technical table used during communication between the application and an external provider. When the OAuth process is happening, this table’s associated status changes:
- If the status is
ok– the user is logged in and redirected to their page. - If the status is
error– an error page is rendered. - If
pending– the user sees the preloader page.

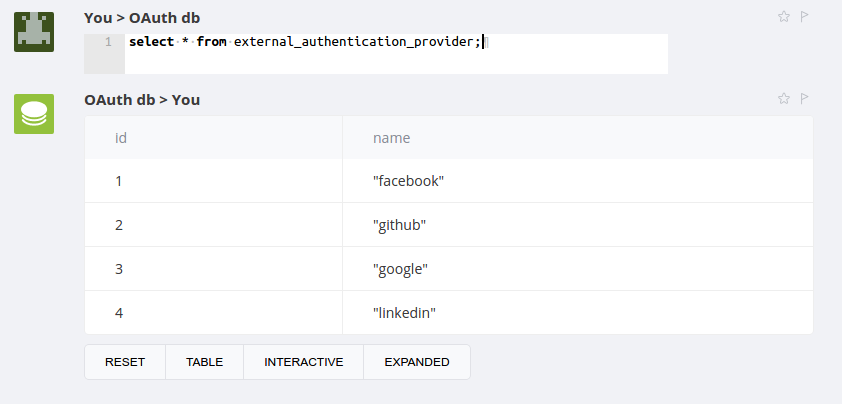
The external_authentication_provider and async_operation_status_type tables are dictionary tables. The application treats them as a read-only tables. In the model, they are grey-colored and they store:
-
Providers’ names: Facebook, Github, Google, LinkedIn
-
Possible statuses when application talks with the external login provider: pending, ok, error.
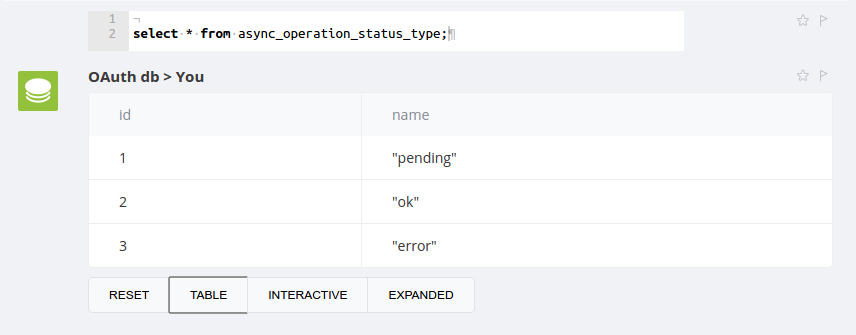
These values are inserted using SQLAlchemy event API.
And finally, the todo_item table stores data associated with each todo item, with references to the appropriate user account.
The Account-Merge Mechanism
At various points in time, at least four scenarios can cause changes to login information:
- A regular account is created via the [sign up] button.
- An account is created with an external provider login.
- The user adds a new external login to their current account.
- The user adds an existing account to their current account.
We’ll look at each of these individually.
-
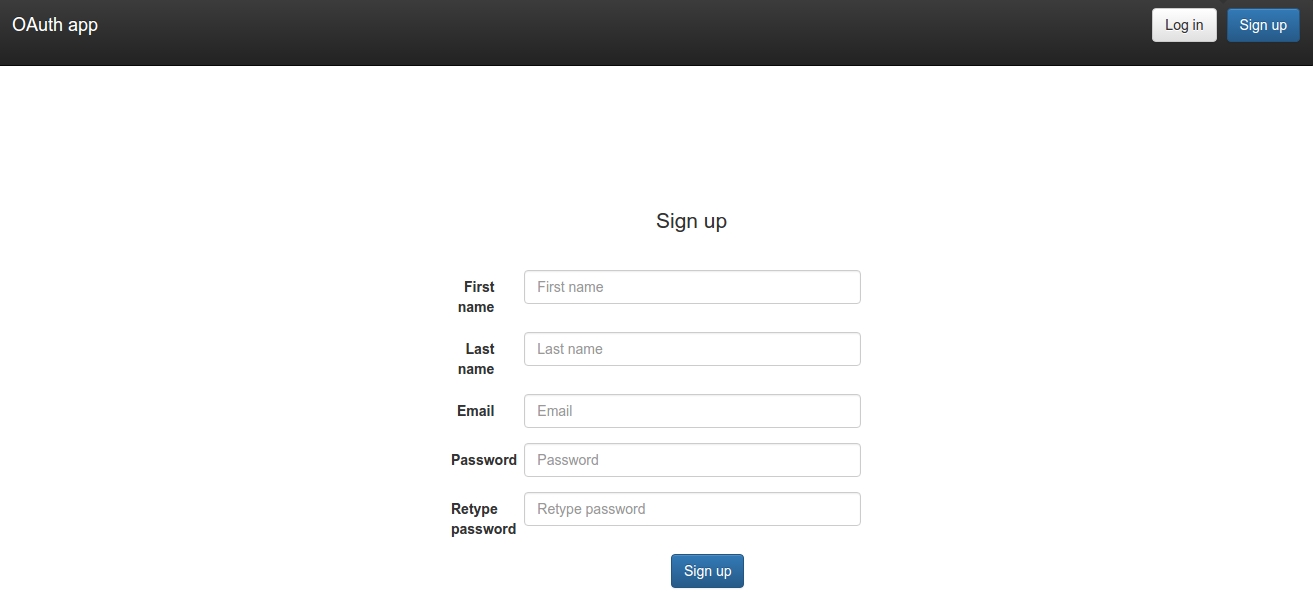
A regular account is created via the [sign up] button. In this scenario, the following actions happen:
- The user accesses the registration page.
- They submit their information
- A Python function calculates the hash from the received password.
- The user’s credentials are stored in
user_detailstable and they are logged in.
The code for this function looks like this:
@app.route('/signup', methods=['GET', 'POST'])
def create_new_account():
   if request.method == 'POST':
       first_name = request.form['first_name']
       last_name = request.form['last_name']
       email = request.form['email']
       password = request.form['password'].encode('utf-8')
       retype_password = request.form['retype_password'].encode('utf-8')
       # if the same email was used to log in
       if email == UserExternalLogin.query.filter_by(email=email).first():
           provider = UserExternalLogin.query.filter_by(email=email).join(ExternalAuthenticationProvider).first()
           flash('This email was already used to login with' + str(provider.name))
       if password == retype_password:
           password_salt = bcrypt.gensalt()  # generate salt
           password_hash = bcrypt.hashpw(password, password_salt)  # generate password hash

           user_details = UserDetails(first_name=first_name, last_name=last_name, email=email,
                                      password_hash=password_hash,
                                      password_salt=password_salt)
           db.session.add(user_details)
           db.session.commit()

           new_user = UserAccount(screen_user_name=first_name + ' ' + last_name, user_details_id=user_details.id)
           db.session.add(new_user)
           db.session.commit()
           login_user(new_user)
           return redirect(url_for('success'))
       else:
           flash('Passwords don't match')
           return redirect(url_for('/signup'))
   else:
       return render_template('signup-form.html')
The logged-in user is redirected to the '
success' page, where they have the option to add their Facebook, Google, Github or LinkedIn logins to their account. -
An account is created with an external provider login. Now, let’s create an account using the [login with Google] button. In this situation, the flow looks like this:
- The user clicks the ‘Login with Google’ button.
- The endpoint url to the proper function is generated, which starts the authorization process. This mechanism was described in the article Implementing the ‘Login with Facebook’ Button.
The user is redirected to Google’s page, where they accept the application’s access to their information. The application then retrieves the user’s data. During the actual authorization process, the user sees the preloader page. This is when requests to check the status are sent to the appropriate application endpoint. If the status is ‘
error’, the error page is rendered; if the status is ‘ok’, the user is logged in and is redirected to the ‘success’ page. The diagram below shows what happens in the browser during this process.
What is stored in the database?
The user has created an account using the [login with Google] button. When the retrieved external user’s data is stored in the
user_external_login, an additional record in theuser_accounttable is created. This record is then paired with the appropriate one in theuser_external_logintable.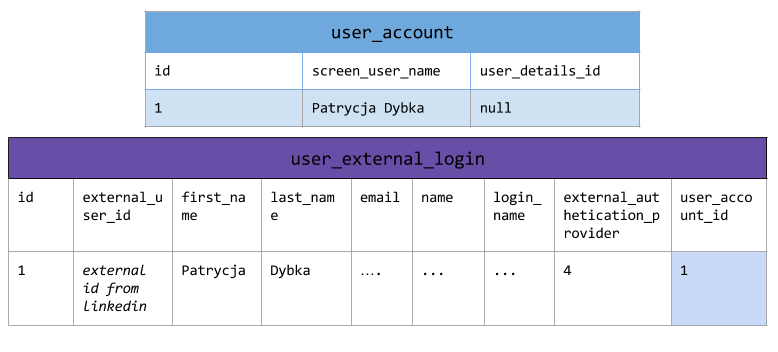
How does it look in code?
We start with creating the record in the
user_accounttable:screen_user_name = name user_account = UserAccount(screen_user_name=screen_user_name) db.session.add(user_account) db.session.commit()
Then, the appropriate record in the
user_external_logintable is created:user_login = UserExternalLogin(external_user_id=external_id, email=email, first_name=first_name,last_name=last_name, name=name,login_name=login, user_account_id=user_account.id, external_authentication_provider_id=external_authentication_provider.id)The relevant parts are shown in the
external_authmethod:def external_auth(provider): # if the user is new, we store their credentials in user_external_login table if not user_login: # user logs in with external provider for the first time if not session.get('logged_in'): screen_user_name = name user_account = UserAccount(screen_user_name=screen_user_name) db.session.add(user_account) db.session.commit() # logged user wants to add social account else: … ... # create record in user_external_login table external_authentication_provider = ExternalAuthenticationProvider.query.filter_by(name=provider).first() user_login = UserExternalLogin(external_user_id=external_id, email=email, first_name=first_name, last_name=last_name, name=name, login_name=login, user_account_id=user_account.id, external_authentication_provider_id=external_authentication_provider.id) db.session.add(user_login) db.session.commit()The rendered user’s page appears as follows:
-
The user adds a new external login to their current account. In this situation, we want to use the [add external login] button. This operation will start the authentication process and associate the new external login with the current user account. After connecting external logins, any login will load the same user account.
What is stored in the database?
Because we want to associate a new login with the user’s current account, we retrieve the appropriate record from the user account. New external data is stored in the
user_external_logintable, with the columnuser_account_idset to the ID of the current user account.
How does it look in code?
In order to link to another external login, we need to fetch the appropriate record from the
user_accounttable, as the line below shows:user_account = UserAccount.query.filter_by(id=current_user.id).first()
After the user’s data is retrieved, a record is created in the
user_external_logintable that includes the ID of the user’s previously-retrieved account.user_login = UserExternalLogin(external_user_id=external_id, email=email, first_name=first_name, last_name=last_name, name=name, login_name=login, user_account_id=user_account.id, external_authentication_provider_id=external_authentication_provider.id)
This record is then stored in the database and the created and persisted status in the database
async_operationchanges took. Consequently, the user is redirected to the/successendpoint, where they can view their external logins and todo items.The relevant part of this process is listed below.
def external_auth(provider): oauth = OAuthLogin.get_provider(provider) external_id, email, first_name, last_name, name, login = oauth.get_user_data() … … ... user_login = UserExternalLogin.query.filter_by(external_user_id=external_id).first() # if the user is new, we store their credentials in user_external_login table if not user_login: # user logs in via oauth for the first time if not session.get('logged_in'): … … else: user_account = UserAccount.query.filter_by(id=current_user.id).first() # create record in user_external_login table external_authentication_provider = ExternalAuthenticationProvider.query.filter_by(name=provider).first() user_login = UserExternalLogin(external_user_id=external_id, email=email, first_name=first_name, last_name=last_name, name=name, login_name=login, user_account_id=user_account.id, external_authentication_provider_id=external_authentication_provider.id) db.session.add(user_login) db.session.commit() -
The user adds an existing account to their current account. This last scenario is the situation we discussed at the outset: merging existing accounts.
What is stored in the database?
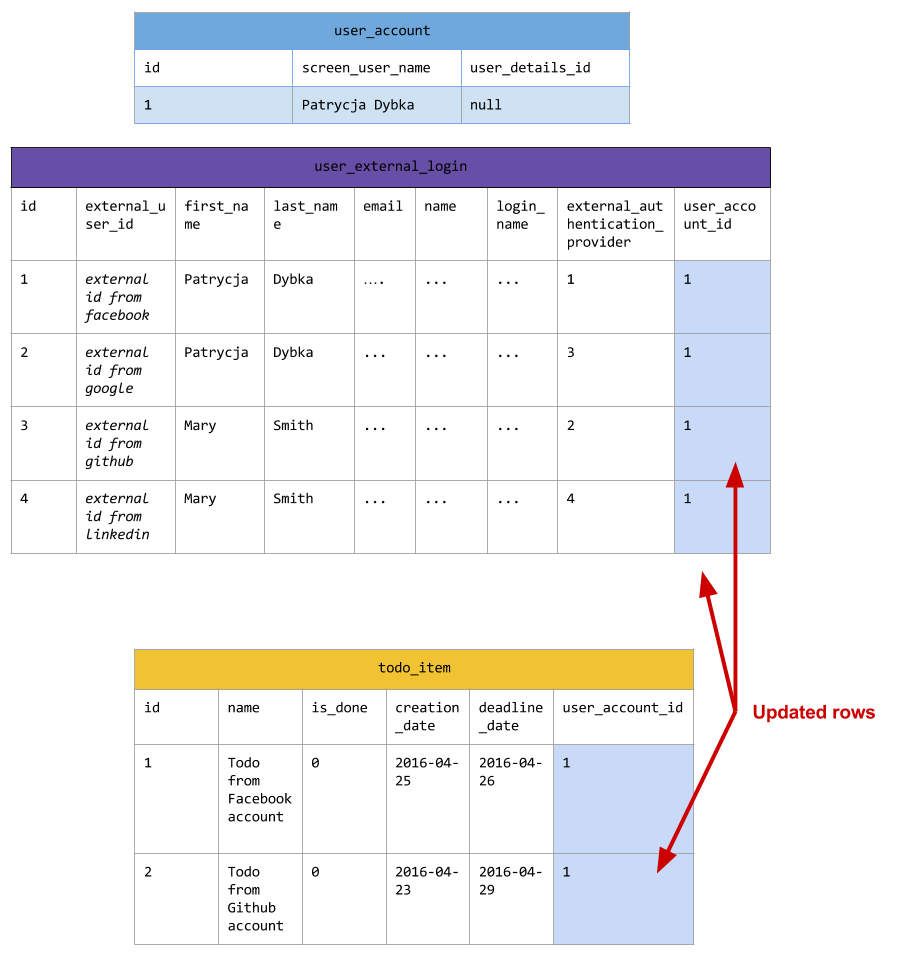
Let’s assume that the current user, Patrycja Dybka, wants to add another external login to her account. We’ll say this is the Github account registered to Mary Smith. Unfortunately, Mary Smith’s Github account already exists in the database and is associated with a different LinkedIn account. This situation looks like this:

What does it look like in the application?
In order to associate these two accounts, the following actions need to happen:
All the todo items belonging to Mary Smith’s account are updated. We simply change the
user_account_idcolumn to the value of the current user, Patrycja.todo_items = db.session.query(TodoItem).join(UserAccount).join(UserExternalLogin).filter_by(external_user_id=external_id).all() for todo_item in todo_items: todo_item.user_account_id = current_user.id db.session.add(todo_item)
-
Then, we check if Mary Smith’s login is associated with other user logins. In this case, we have to retrieve all Mary Smith’s logins (Github and LinkedIn).
user_logins = UserExternalLogin.query.filter_by(user_account_id=user_login.user_account_id).all()
And for all of them, we have to set the value of the
user_account_idto the id of the current user.for login in user_logins: login.user_account_id = current_user.id db.session.add(user_login) db.session.commit()
After these operations, the appropriate tables in the database will look as presented below:
Let’s Open This Up To Discussion!
What’s the best way to merge accounts? Do you have any ideas on how to identify multiple user accounts? Any thoughts if such an option is secure and practical?
