

Handling user registration and authentication isn’t an easy task. Both users and developers understand this. Users have to select and remember another username and password (taking into account different password policies, of course). A developer’s responsibility is to make this process secure and to properly protect the user’s data. So it’s no surprise that logging in with one account – Facebook or Google, for example – is extremely popular. Users gain easy access, and developers can delegate the sensitive process of authenticating users to social media services.
Logging in with Facebook or some other site is possible thanks to the OAuth protocol. This standard presents specific authorization flow for web applications, desktop applications, and mobile phones. Currently, there are two versions of it. The newest one, OAuth 2.0, is used by Facebook, Google, Github, LinkedIn, Reddit, and Dropbox. Twitter still uses the previous version, OAuth 1.0a, which has a different flow.
To inspect this process, let’s take a look at the OAuth 2.0 protocol. We will use Flask framework and the Rauth OAuth 2.0 consumer library to implement it in Python.
The OAuth 2.0 Protocol Flow
For purposes of implementing an external login functionality, take a look at:
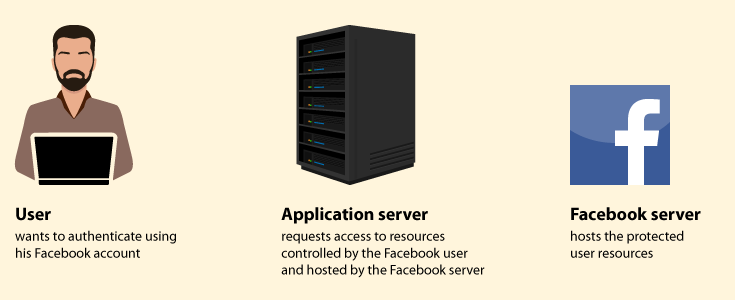
The OAuth 2.0 protocol uses three roles that communicate with each other. These are:
- The User – who wants to authenticate using his or her Facebook account
- The Application Server – our app which requests, on the user’s behalf, authorization from Facebook
- The Facebook Server – which is, in this case, the authorization and resource server. It authenticates users and gives approval to the application to access to the user’s resources.
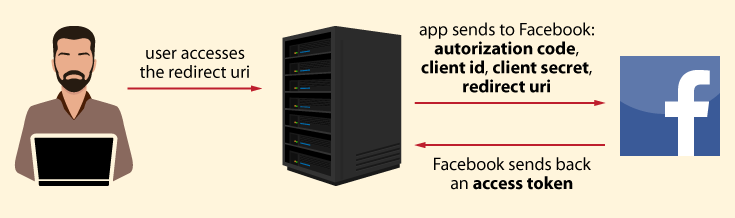
Because the protocol flow is quite complicated, here’s a short description of whole process. The authentication starts when user clicks the
The whole authentication flow looks something like the following:
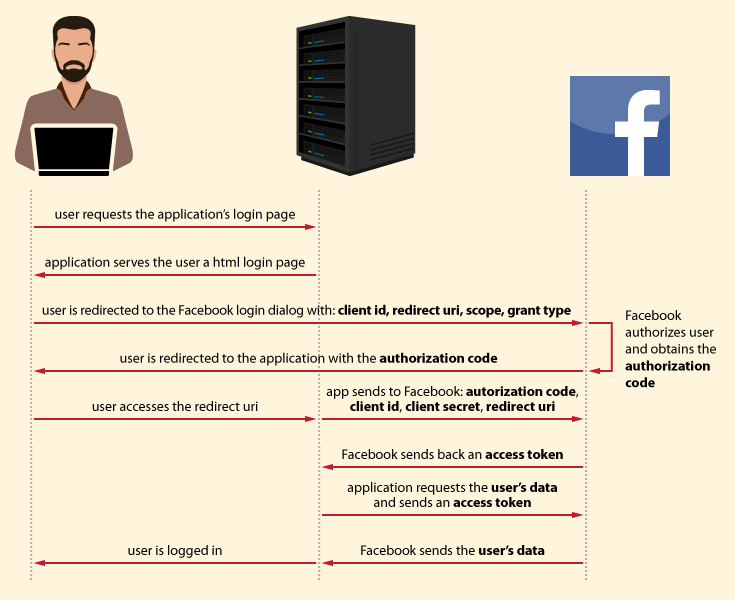
Let’s look at each step in detail.
How The User Logs In Via Facebook
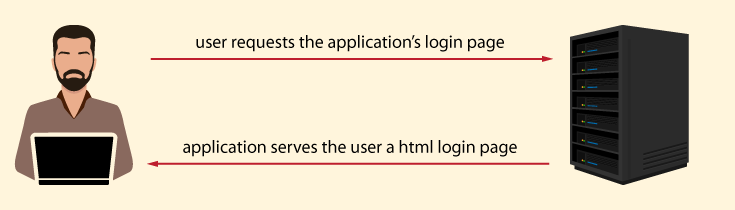
A. The user accesses the application login page
The process starts with the user requesting the application’s login page. In response, the application serves the user a HTML login page.
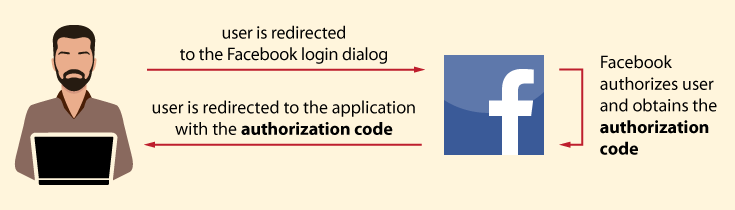
B. The user authorizes the application in Facebook
The user clicks the
- client_id – a unique number obtained from Facebook while registering our application
- redirect_uri – the URL to which the user is redirected after the Facebook authorization. It is configured during the application’s registration
- scope – a comma-separated list of permissions to request from the user using our app. All available scopes for Facebook are listed here.
- grant_type – the credential that represents the Facebook user authentication employed by the application to get its access token. This can be an authorization code, an implicit grant, resource owner password credentials, or client credentials. We will use the authorization code.
If the user isn’t logged in, they must authenticate in Facebook and authorize the application’s access to their Facebook account. (The application doesn’t participate in this and doesn’t know the user’s credentials). After a successful authorization, Facebook directs the user back to the application with the authorization code. While the user access the app page, in the background, the application starts communication with Facebook.
C. The application authorizes in Facebook and requests an access token
While the user accesses the redirect URI in the application – which typically displays a preloader image, the application connects to the Facebook server in the background. The application requests an access token. It sends the obtained authorization code and the redirect URI with its own client id and client secret. During this process, Facebook validates data. In particular:
- The application authenticates in Facebook with its client id and client secret.
- Facebook validates the authorization code.
- Facebook checks if the received redirect URI matches the URL used to redirect user in Step B.
If everything is valid, Facebook responds back with an access token.
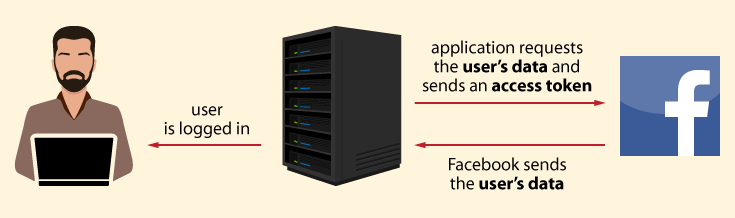
D. The application retrieves the user’s data from Facebook
In order to retrieve the user’s data, the application sends an access token with requested data to Facebook. Facebook verifies the access token and returns the user’s data in response. The application stores the user’s data in its database and signs the user in.
Now that we’ve gotten to know the OAuth 2.0 protocol a little bit, let’s see how it will look in an example application.
Testing OAuth with a Flask Application
Application Requirements
The application uses:
- Flask – a Python framework for web applications
- Flask-SQLAlchemy – Flask wrapper for Python ORM SQLAlchemy
- SQLite database
- Rauth – A Python OAuth 2.0 and OAuth 1.0a library
The file requirements.txt contains all of packages with exact versions.
The code for the example application consists of these files:
- app.py – contains declared view functions responsible for rendering an HTML page and a function that assists in user session management (logging in and out)
- models.py – contains an SQLAlchemy model related to presented database design
- facebook_auth.py – contains the external authentication part
- task.py – an asynchronous task manager for background task handling (the part where the application communicates with Facebook)
- /static/facebookAuthStatus.js – updates user on the status of requests between the application and the Facebook server. Depending on the received value, the user sees the pre-loader, error, or success page.
- /templates – a directory that contains HTML templates
The code is hosted on Github.
Database Design
The vast majority of various applications include a user login function, as does the online forum prototype you’ll see below. Usually, login data includes a user’s login and password; in this case, we’ll delegate the process of user authentication to an external resource (Facebook) and rely on their data. The user’s retrieved data will be stored in the user_profile table. Remember: ‘user’ is a reserved keyword in many databases, so naming the table simply ‘user’ is not a good idea).
The following columns in the user_profile table are provided to store appropriate information:
id– is an artificial PKfacebook_id– the user id retrieved from Facebook. We’ve created a UNIQUE constraint on this column, since the entry is unique to each user. Looking at the value of this field, we can check the database to see if the user is registered in our application.first_name– the user’s first name, as retrieved from their Facebook accountlast_name– the user’s last name, as retrieved from their Facebook accountemail– the user’s email address, as retrieved from their Facebook account
Because Facebook communicates with our application, we will need two extra tables: the async_operation table and a related dictionary table called async_operation_status that stores three available statuses: pending, error, and ok.
The appropriate SQLAlchemy classes that reference to the tables are as follows:
class UserProfile(UserMixin, db.Model):
    __tablename__ = 'user_profile'
    id = db.Column(db.Integer, primary_key=True)
    facebook_id = db.Column(db.String(64), nullable=False, unique=True)
    first_name = db.Column(db.String(64), nullable=True)
    last_name = db.Column(db.String(64), nullable=True)
    email = db.Column(db.String(64), nullable=True)


# dictionary table. Stores values: pending, ok, error
class AsyncOperationStatus(db.Model):
    __tablename__ = 'async_operation_status'
    id = db.Column(db.Integer, primary_key=True)
    code = db.Column('code', db.String(20), nullable=True)


class AsyncOperation(db.Model):
    __tablename__ = 'async_operation'
    id = db.Column(db.Integer, primary_key=True)
    async_operation_status_id = db.Column(db.Integer, db.ForeignKey(AsyncOperationStatus.id))
    user_profile_id = db.Column(db.Integer, db.ForeignKey(UserProfile.id))


   status = db.relationship('AsyncOperationStatus', foreign_keys=async_operation_status_id)
   user_profile = db.relationship('UserProfile', foreign_keys=user_profile_id)


event.listen(
        AsyncOperationStatus.__table__, 'after_create',
        DDL(""" INSERT INTO async_operation_status (id,code) VALUES (1,'pending'),(2, 'ok'),(3, 'error'); """)
)
Registering the Application with OAuth Providers
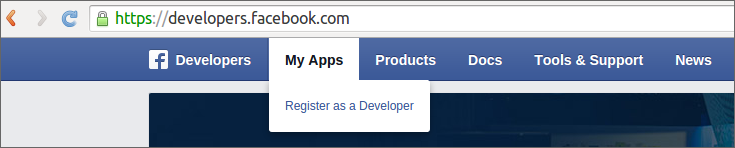
The first step in external authentication is registering our app with an external provider. In order to provide Facebook authentication, visit Facebook for Developers and go to My Apps -> Register. You’ll have an opportunity to register your app with a list of providers who enable OAuth authentication.
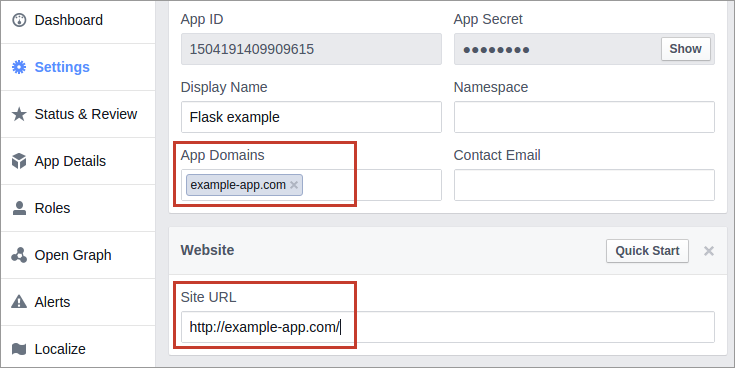
Next, you will go to the Application Settings. At this point, we’re most interested in App Id and App Secret (the application’s credentials for Facebook). OAuth uses these keys to figure out who is connecting to the remote application. These keys don’t impart user authentication.
On the provider’s site in the settings of your newly created app, enter your application’s URL and app domain.
Note that Facebook doesn’t allow localhost for apps (URL when registering your app with Facebook). So, in the development phase you’ll have to create a tunnel to your localhost (for example, by using ngrok to make your local server accessible over the Internet). Or you can create a line in /etc/hosts that will map our hostname to an IP address. It would look something like this:
127.0.0.1 example-app.com
Back to our example. In Facebook for Developer’s registered app settings, we should have specified the App Domain as example-app.com and the Site URL as http://example-app.com/.
Now, we’ll move on to application configuration.
Configuring the Application
We must provide configuration for our application. We can internally hardcode it, or we can place it in a separate file located outside the actual application package.
I’ll demonstrate the hardcode option for simplicity’s sake. Flask provides a config object that is a subclass of a dictionary. It handles configuration values for Flask and for extensions.
At this point, we have to add the previously-obtained app_id and app_secret and pass the SQLite connection URI to app.config in models.py. The relevant code looks like this:
app.config['SECRET_KEY'] = 'secret value'
app.config['SQLALCHEMY_DATABASE_URI'] = 'sqlite:///db.sqlite'
app.config['OAUTH_CREDENTIALS'] = {
   'facebook': {
       'id': '4445949623923',
       'secret': 'APP_SECRET'
   }
}
A Closer Look at Web Application Flow
Now that we have an overview of the flow, let’s look at the code associated with the various steps in this process.
A. The user accesses the application login page.
The user starts the process by requesting a login page. In the response, the server gives the user an HTML page. This is handled in the Flask index() function presented below.
@app.route('/')
def index():
   return render_template('index.html')
The working of this view function does the following: when an URI ‘/’ is requested, the function index() renders an index.html (the route decorator registers index() functions with URL rule ‘/’).
The rendered page looks as follows.
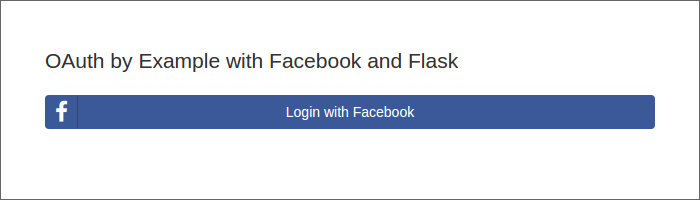
The content of the index.html is as follows:
<html>
   <head>
       <title>OAuth Example app</title>
        <link rel="stylesheet" href="/static/bower_components/bootstrap-social/bootstrap-social.css">
        <link rel="stylesheet" href="/static/bower_components/bootstrap/dist/css/bootstrap.css">
        <link rel="stylesheet" href="/static/bower_components/font-awesome/css/font-awesome.css">
        <script src="/static/bower_components/jquery/dist/jquery.js"></script>
   </head>
   <body>
       <div class="col-sm-4">
       <h1 class="lead">OAuth by Example with Facebook and Flask</h1>
           {% for message in get_flashed_messages() %}
               <p><b>Error</b>: {{ message }}</p>
           {% endfor %}
           {% if current_user.is_authenticated %}
               <h2 class="lead">Hi, {{ current_user.first_name }}!</h2>
               <p><a class="btn btn-default" href="{{ url_for('logout') }}">Logout</a></p>
           {% else %}
               <p>
                   <a class="btn btn-block btn-social btn-facebook" href="{{ url_for('facebook_authorize') }}">
                       <span class="fa fa-facebook"></span>
                       Login with Facebook</a>
               </p>
           {% endif %}

       </code>
   </body>
</html>
B. The user authorizes the application in Facebook.
Next, the user clicks the
<a class="btn btn-block btn-social btn-facebook" href="{{ url_for('facebook_authorize') }}">
   <span class="fa fa-facebook"></span>
   Login with Facebook</a>
Flask’s url_for() function will generate a URL to the given endpoint with the provided facebook_authorize() method. This function starts the authorization phase.
The definition of the facebook_authorize() can be found in the app.py file and looks like this:
@app.route('/authorize')
def facebook_authorize():
   if not current_user.is_anonymous: # if user logged in
       return redirect(url_for('index'))
   oauth = FacebookSignIn() # if user anonymous, begin the authorization phase
   return oauth.authorize()
First, we have to check if any user is currently logged in. If so, we must initiate the authentication process that is delegated to FacebookSignIn class by invoking the authorize() method.
Take a look at the definition of FacebookSignIn class presented below:
class FacebookSignIn(object):

   def __init__(self):
       credentials = current_app.config['OAUTH_CREDENTIALS']['facebook'] #takes the app credentials obtained in Facebook
       self.consumer_id = credentials['id']
       self.consumer_secret = credentials['secret']
       self.service = OAuth2Service(
           name='facebook',
           client_id=self.consumer_id,
           client_secret=self.consumer_secret,
           authorize_url='https://www.facebook.com/dialog/oauth',
           access_token_url='https://graph.facebook.com/oauth/access_token',
           base_url='https://graph.facebook.com/'
       ) # initialize the OAuth2 service object with the app credentials and URLs required by the OAuth2 machinery
The Rauth library is responsible for the OAuth flow. To use it, we need to initialize the service object as an instance of an OAuth2Service class (because Facebook is using OAuth 2.0 version of the protocol) with:
- the name of the social provider. For our purposes, it’s
facebook - the
client_idandclient_secretkeys obtained on the Facebook developer’s site. These values were put into the Flask config object when we configured the application as described above. - The URLs required for the OAuth machinery and for each provider.
- In particular:
authorize_urlis the URL used to connect during the user Facebook authorization.access_token_urlis the URL to which a request is made to exchange a code for an access token.base_urlis a prefix URL for making Facebook API requests.
- In particular:
Additionally, the class contains functions used in various parts of OAuth authentication. We’ll describe these more specifically as they come up. For now, just keep them in mind:
get_callback_url()authorize()callback()
Returning to our user. We are at the moment when the user clicks the facebook_authorize() function is invoked, which initializes the authentication process by creating an instance of FacebookSignIn class and invoking its authorize() method. This method redirects the user to the Facebook login dialog, where they are prompted to accept requested permissions if they are already logged in. If they are not logged in, the user is required to sign in and then accept the permissions.
This is the code for the authorize() function:
def authorize(self):
   return redirect(self.service.get_authorize_url(
       scope='public_profile,email',
       response_type='code',
       redirect_uri=self.get_callback_url()
   ))
As you can see, the function returns a generated redirect URI. The URI invokes its get_authorize_url() method with additional parameters:
- scope: a comma-separated list of permissions to request from the user. Specifically, we’re looking for the user’s id (assigned by Facebook), their first and last name, and their email. With the exception of email, these values are available in the
public_profilescope. They are implied in every request, so you don’t have to declare them. We do have to declare email permissions. - response_type: declares the response data included when the redirect back to the app occurs in the URL parameters (in the OAuth 2.0 reference it is represented by the grant_type). For our purpose, we’ll use a ‘code’ grant type.
- redirect_uri: The URL where we’ll redirect the returning user. This URL was specified during the application registration in Facebook and is retrieved by using
get_callback_url()function. This is a required parameter. - state: A unique string created by our app to protect against cross-site request forgery. In this example, it is omitted for the sake of simplicity.
- client_id: This value is automatically added to the requested parameters by the Rauth’s
get_authorize_url()method. It is used to protect our app from accepting a code intended for an application with a differentclient_id.
So, now we have generated an authorization code link. At this point, the user accesses the Facebook login form (if they aren’t currently logged in), where they must authenticate their identity.
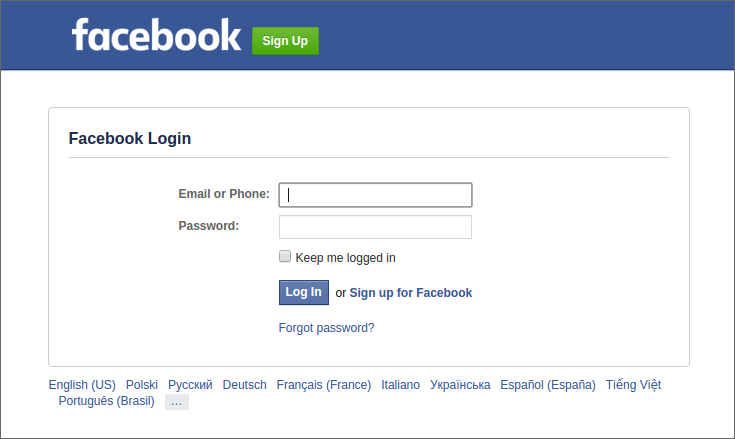
Then, they will be asked to authorize the application’s access to their account.
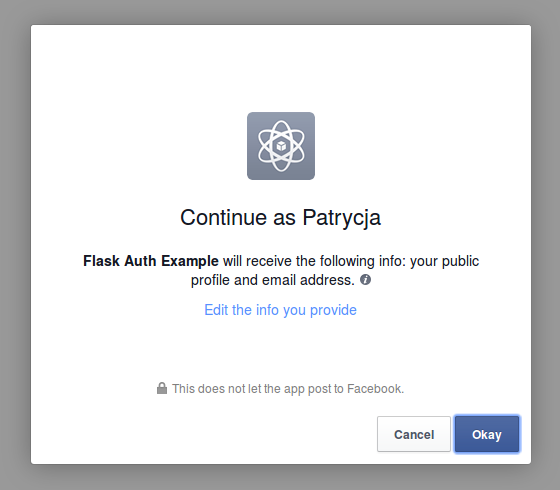
When the user clicks ok, they are sent to the redirect_uri with the authorization code obtained from Facebook. There is a different authorization code each time the user logs in.
C + D. Application authorizes in Facebook, exchanges the access token, and retrieves user’s data from Facebook.
Thanks to Rauth library, actions C and D can be performed together.
Next, our app needs to handle the Facebook callback. For this step, we’ll make use of the show_preloader_start_authentication() function. The main duties of this function are:
- To send the user to the page with the preloader, and
- To start the background communication with Facebook.
Because communication with other services via http is usually long, that’s way is performed in a separate thread. This forces us to place the code where our application talks to Facebook in a different task. The user, during this process, sees the preloader page and must wait until the background thread finishes.
Before we launch the background task, we create the record of the async_operation, that represents the status of task execution: pending, ok, error. We’ll also store the id of the async_operation within the session. Based on this value, we can retrieve the appropriate record of the async_operation when it’s time to change its status. These values tell us what we next have to do with user, as the code below shows:
@app.route('/callback')
def show_preloader_start_authentication():

    if not current_user.is_anonymous:
        return redirect(url_for('index'))

    # store in the session id of the asynchronous operation
    status_pending = AsyncOperationStatus.query.filter_by(code='pending').first()
    async_operation = AsyncOperation(async_operation_status_id=status_pending.id)
    db.session.add(async_operation)
    db.session.commit()
    # store in a session the id of asynchronous operation
    session['async_operation_id'] = str(async_operation.id)
    # run external_auth in the separate thread
    taskman.add_task(external_auth)
    return redirect(url_for('preloader'))
The line where we run a separate task is shown below :
taskman.add_task(external_auth)
Taskman is an instance of an asynchronous task manager, a simple implementation for background task handling that you can download from Github.
During the execution of this code, the user is redirected to the page with the preloader, which sends requests to our server and checks if the communication with Facebook is done. In other words, it checks to see if the status of the async_operation is set to ‘ok’.
Our application has defined an endpoint where we send requests from the preloader page.
The get_status function handles this and retrieves the status of the current async_operation.
@app.route('/get-status')
def get_status():
    if 'async_operation_id' in session:
        async_operation_id = session['async_operation_id']
        # retrieve from database the status of the stored in session async operation
        async_operation = AsyncOperation.query.filter_by(id=async_operation_id).join(AsyncOperationStatus).first()
        status = str(async_operation.status.code)
        print async_operation.status.code
    else:
        print "async operation not in session"
        return redirect(url_for(error))

    return status
The relevant JavaScript function (which manages requests to the get-status endpoint and redirects to the appropriate page) is presented as follows:
var requestingInterval = 1000;
var trialsNumber = 60000/requestingInterval;


function doRequest() {
$.ajax({
        type : "GET",
        url : "/get-status",
        contentType: 'application/json;charset=UTF-8',
        success: function(data) {
            console.log(data)

            if (data === 'ok') {
             console.log(data)
             window.location.replace("/success")
            }

            if (data === 'pending') {
                trialsNumber--;
                if(trialsNumber === 0) {
                    window.location.replace("/error")
                }
                //send request after 1000ms
            setTimeout(function() {
                doRequest(); },requestingInterval);
             }


            if (data === 'error') {
                console.log(data)
            window.location.replace("/error")
            }
        }
    });
}


function runCheckingStatus() {
    doRequest();
}
What we have left is the description invoked in the task manager, external_auth() function. It initializes an object of the FacebookSignIn class in order to invoke the callback() method that will exchange code for an access token and get the user’s data. If we have the retrieved value of the facebook_id in our database, we’ll get the user object from a database. If the value isn’t in our database, we store it in the database, along with other data. At this point, the status of the async_operation will change to ok.
def external_auth():
   oauth = FacebookSignIn()
   facebook_id, email, first_name, last_name = oauth.callback()
   if facebook_id is None:
       flash('Authentication failed')
       # change the status of async operation for 'error'
       status_error = AsyncOperationStatus.query.filter_by(code='error').first()
#        print "external auth" + session['async_operation_id']
       async_operation = AsyncOperation.query.filter_by(id=session['async_operation_id']).first()
       print async_operation.id
       async_operation.async_operation_status_id = status_error.id
       db.session.add(async_operation)
       db.session.commit()
       return redirect(url_for('error'))

   # retrieve the user data from the database
   user = UserProfile.query.filter_by(facebook_id=facebook_id).first()

   # if the user is new, we store their credentials in user_profile table
   if not user:
       user = UserProfile(facebook_id=facebook_id, email=email, first_name=first_name, last_name=last_name)
       db.session.add(user)
       db.session.commit()

   # change the status of the async operation for 'ok' and insert the value of the user id
   # to the async_operation table
   status_ok = AsyncOperationStatus.query.filter_by(code='ok').first()
   async_operation = AsyncOperation.query.filter_by(id=session['async_operation_id']).first()
   async_operation.async_operation_status_id = status_ok.id
   async_operation.user_profile_id = user.id
   db.session.add(async_operation)
   db.session.commit()
Let’s come back for a moment to the callback() function. A very short description of the responsibility of this method is to handle the process of exchanging the code for an access token and retrieving user data. If you want to see this in code, open the facebook_auth.py file.
In order to illustrate this action, we have to return to the moment when the user authorizes the application’s access of their Facebook account. As a result, Facebook directs the user back to the application with the authorization code.
- If there isn’t a code in the request args, the function returns a 4-element tuple with None values.
- Once we have the url with a code we can ask for an access token. In order to do that, we need to create the Rauth
oauth_session. We do this by passing the authorization_code and redirect_uri. The client_id and client_secret are automatically retrieved for app configuration by Rauth and added to the
datadictionary. The code looks something like this:oauth_session = self.service.get_auth_session( data={'code': request.args['code'], 'redirect_uri': self.get_callback_url() }We don’t need to do anything more. Rauth handles the access token exchange and parses the Facebook response.
When the Rauth library finishes exchanging the access token and retrieving data, we can obtain the user’s data with a single line:
user_data = oauth_session.get('me?fields=id,email,first_name,last_name').json()We return the user data as a four-element tuple:
return ( user_data=['id'], user_data.get('email'), user_data.get('first_name'), user_data.get('last_name') )
The complete implementation is as follows:
def callback(self):
if 'code' not in request.args:
return None, None, None, None
  oauth_session = self.service.get_auth_session(
            data={'code': request.args['code'],
                  'redirect_uri': self.get_callback_url()
}
)
user_data = oauth_session.get('me?fields=id,email,first_name,last_name').json()
 return (
            user_data=['id'],
            user_data.get('email'),
            user_data.get('first_name'),
            user_data.get('last_name')
        )
Logging the user
Our final function with any relevancy to this process is the one handling login and redirect. To explain this part, we must return again to the facebookAuthStatus.js. This time we are interested only in the following fragment:
 if (data === 'ok') {
     console.log(data)
     window.location.replace("/success")
 }
So, when we receive the ok status from the async_operation, the user is redirected to the /success endpoint. When the user reaches this endpoint, our application:
- Retrieves the
async_operationrecord from the database that matches the id stored in the Flask session - Retrieves the user record related to this operation
- Logs the user in
- Renders a template index.html and redirects the user.
@app.route('/success')
def success():
if 'async_operation_id' in session:
async_operation_id = session['async_operation_id']
async_operation = AsyncOperation.query.filter_by(id=async_operation_id).join(UserProfile).first()
user = UserProfile.query.filter_by(id=async_operation.user_profile_id).first()
login_user(user, True)
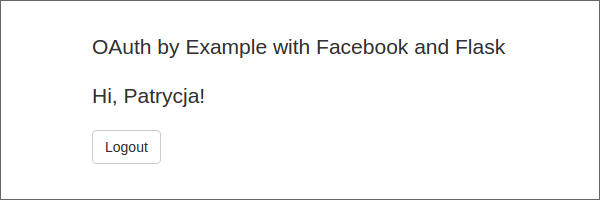
return redirect(url_for('index'))
The user finally is logged into our application and sees:
At the start, the flow of the OAuth protocol makes it look like the authentication process should be much more complicated. The results are quite surprising, because (with the help of many libraries) it’s very easy to provide external authentication in our applications.
In regards to OAuth, however, some interesting issues appear. The one I primarily noticed is the protocol’s reluctance to import more than just an email, name, and surname into the application. (Although, to be fair, users may be wary of this as well.) Usually, applications may also request access to photos, lists of contacts, and more. These limits may discourage the traditional way of external authentication. What are your thoughts about it?
