

When you’re using a data warehouse, some actions get repeated over and over. We will take a look at four common algorithms used to deal with these situations.
Most DWH (data warehouse) systems today are on a RDBMS (relational database management system) platform. These databases (Oracle, DB2, or Microsoft SQL Server) are widely used, easy to work with, and mature – a very important thing to bear in mind when choosing a platform. Although they include special features for DWH configuration (like bitmap indexes, partitioning, and materialized views) we still have to take care of data transformation ourselves.
In this article, we will examine four algorithms for working with the data in RDBMS DWH systems. As much of DWH development revolves around temporal-sensitive data, most of the algorithms will deal with changing data in that way.
All of the techniques we will consider are written in pure SQL, not procedural SQL (like PL/SQL). When writing batch-oriented algorithms, it is always more prudent to write in pure SQL. This is because SQL is translated via an execution optimizer (i.e. Oracle CBO) which chooses the optimal execution and order of sub-operations for the query. How CBO does this is a fascinating subject; perhaps we will explore it a bit more in an upcoming article. For now, let’s stick with the algorithms.
We will start with the simple stuff and slowly increase the complexity.
1. Adding Information to a Periodic Snapshot Fact Table
First of all, let’s see how to transform a periodic snapshot fact table with fixed time intervals to include Type 2 information that is updated over time.
To refresh your knowledge of fact table types and organizations, see my previous article. We will use the same fact tables here.
So our first table is fact_account_snapshot and our fact table (with Type 2 technical columns) is fact_account_snapshot_period. They hold the same information, but there’s a difference in how they organize the data. The fact_account_snapshot table contains data for every snapshot date, while fact_account_snapshot_period stores data only when it has changed. Both hold account balance information, so in our case we will have a couple of accounts with balances that have changed through time.
To transform the rows and fill the fact_account_snapshot table from the period table, all we need to do is expand the monthly period of the fact_account_snapshot_period table with every snapshot date contained in that period.

Picture 1: Monthly period to snapshot
To do this, we need to connect the fact_account_snapshot_period to a time dimensional table which contains the snapshot dates. Let’s say that this table is called dim_time. (We should mention that fact_seq represents the ID sequence of the fact_account_snapshot table.) The SQL statement for the transformation is simple:
insert into
  fact_account_snapshot(id,time_id,employee_id,account_id,balance_amount)
as select
  fact_seq.nextval,
  dt.time_id,
  fasp.employee_id,
  fasp.account_id,
  fasp.balance_amount
from fact_account_snapshot_period fasp
join dim_time dt
on (date_from >= time_date
and date_to <= time_date )
Note: If the upper bound of the date_to column is NULL for a high date (such as 31.12.9999), you will need to include an NVL or CASE statement to limit date_to to the max snapshot date you require.
With this type of organization, we are sacrificing space for speed. The new organization takes more memory, but it requires less from the CPU.
2. From Snapshot to Type 2 Organization
Now if you do mind your tables taking a lot of space and you have some snapshot fact tables, you can transform them to a Type 2 organization. This is the inverse of the use case we applied in the first algorithm.
To start, we need to transform the data from the snapshot version to the monthly Type 2 version.

Picture 2: Monthly snapshot to period
As this algorithm is more complex, we will break it into three sections. Each section corresponds to one of the three nested SELECT blocks which we will tie together later.
So let’s begin.
First, we need a simple data extract of the first ten rows from the fact_account_snapshot table. Here’s the SQL:
SELECT
  *
FROM
  (SELECT account_id,
     balance_amount,
     time_id
   FROM fact_account_snapshot
   WHERE account_id = 1000
   ORDER BY time_id )
WHERE rownum <= 10;
The data we get is:
| ACCOUNT_ID | BALANCE_AMOUNT | TIME_ID |
|---|---|---|
| 1000 | 0 | 20010201 |
| 1000 | 0 | 20010301 |
| 1000 | 0 | 20010401 |
| 1000 | 9000 | 20010501 |
| 1000 | 0 | 20010601 |
| 1000 | 0 | 20010701 |
| 1000 | 9000 | 20010801 |
| 1000 | 0 | 20010901 |
| 1000 | 0 | 20011001 |
| 1000 | 9000 | 20011101 |
On this data set, we will flag the difference between the current row and the lagging row if there is a difference in the balance_amount. The code looks like this:
SELECT
  account_id,
  time_id,
  balance_amount,
  lag (balance_amount, 1, balance_amount )
       OVER (PARTITION BY account_id ORDER BY time_id) lead_balance_amount,
  CASE
     WHEN lag (balance_amount, 1, balance_amount )
             OVER (PARTITION BY account_id ORDER BY time_id)
          - balance_amount != 0
     THEN 1
     ELSE 0
   END flag
FROM fact_account_snapshot
ORDER BY time_id ;
The data we get is:
| ACCOUNT_ID | TIME_ID | BALANCE_AMOUNT | LAG_BALANCE_AMOUNT | FLAG |
|---|---|---|---|---|
| 1000 | 20010201 | 0 | 0 | 0 |
| 1000 | 20010301 | 0 | 0 | 0 |
| 1000 | 20010401 | 0 | 9000 | 1 |
| 1000 | 20010501 | 9000 | 0 | 1 |
| 1000 | 20010601 | 0 | 0 | 0 |
| 1000 | 20010701 | 0 | 9000 | 1 |
| 1000 | 20010801 | 9000 | 0 | 1 |
| 1000 | 20010901 | 0 | 0 | 0 |
| 1000 | 20011001 | 0 | 9000 | 1 |
| 1000 | 20011101 | 9000 | 10000 | 1 |
As we see here, the flag is set to return a “1” when the previous value of balance_amount for the specific account_id is different from the current value.
Next, we construct groups of rows with same balance_amount values.
with first_part as (
  SELECT
    account_id,
    time_id,
    balance_amount,
    LEAD (balance_amount, 1, balance_amount )
          OVER (PARTITION BY account_id ORDER BY time_id) lead_balance_amount,
    CASE
       WHEN lag (balance_amount, 1, balance_amount)
                 OVER (PARTITION BY account_id ORDER BY time_id)
            - balance_amount != 0
       THEN 1
       ELSE 0
     END flag
   FROM fact_account_snapshot
   ORDER BY time_id )
SELECT
  account_id,
  time_id,
  balance_amount,
  SUM (flag) OVER (PARTITION BY account_id ORDER BY time_id) flag_group
FROM first_part;
The rows we saw earlier are now flagged by flag:
| ACCOUNT_ID | TIME_ID | BALANCE_AMOUNT | FLAG_GROUP |
|---|---|---|---|
| 1000 | 20010201 | 0 | 0 |
| 1000 | 20010301 | 0 | 0 |
| 1000 | 20010401 | 0 | 0 |
| 1000 | 20010501 | 9000 | 1 |
| 1000 | 20010601 | 0 | 2 |
| 1000 | 20010701 | 0 | 2 |
| 1000 | 20010801 | 9000 | 3 |
| 1000 | 20010901 | 0 | 4 |
| 1000 | 20011001 | 0 | 4 |
| 1000 | 20011101 | 9000 | 5 |
Hopefully, you can see the solution on the horizon. All that is left for us to do is to reduce the rows by the group number. We can do this reduction with a simple GROUP BY() statement:
with first_part as (
  SELECT
    account_id,
    time_id,
    balance_amount,
    LEAD (balance_amount, 1, balance_amount)
          OVER (PARTITION BY account_id ORDER BY time_id) lead_balance_amount,
    CASE
      WHEN lag (balance_amount, 1, balance_amount )
                OVER (PARTITION BY account_id ORDER BY time_id)
           - balance_amount != 0
      THEN 1
      ELSE 0
    END flag
  FROM fact_account_snapshot
  ORDER BY time_id ),

second_part as (
  SELECT
    account_id,
    time_id,
    balance_amount,
    SUM (flag) OVER (PARTITION BY account_id ORDER BY time_id) flag_group
   FROM first_part)

select
  account_id,
  balance_amount,
  to_date(min(time_id),'yyyymmdd') date_from,
  add_months(to_date(max(time_id),'yyyymmdd'),1) date_to
from second_part
group by account_id, flag_group, balance_amount
order by date_from;
Note: We added one month to the calculation of the date_to column so we could get a nice lower bound inclusive and upper bound exclusive time period.
| ACCOUNT_ID | BALANCE_AMOUNT | DATE_FROM | DATE_TO |
|---|---|---|---|
| 1000 | 0 | 02/01/01 | 05/01/01 |
| 1000 | 9000 | 05/01/01 | 06/01/01 |
| 1000 | 0 | 06/01/01 | 08/01/01 |
| 1000 | 9000 | 08/01/01 | 09/01/01 |
| 1000 | 0 | 09/01/01 | 11/01/01 |
| 1000 | 9000 | 11/01/01 | 12/01/01 |
| 1000 | 10000 | 12/01/01 | 01/01/02 |
The data is now represented with a time period; in our particular case the ten rows are now condensed to seven rows.
3. Refreshing Batch Data in a Type 2 Snapshot Fact Table
The most common algorithm in the DWH world inserts a new delta of data into a Type 2 table. This can be a dimension or a snapshot fact table, as long as it’s of Type 2 organization.
Delta of data is any data that has changed or been added since a certain time. The difference is calculated in the ETL process. Specifically, we’re searching for new or changed data that needs to be traced in a dimensional table or measured in a fact table.
There are lots of ways we can implement this change. Let’s look at one fun example using analytical functions. For this example, we will return to our old friend, the customer dimension table dim_customer.
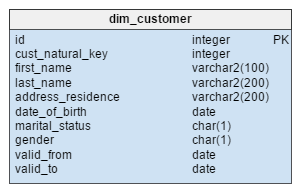
We will take a ten-row extract from the table:
| ID | CUST_ NATURAL_KEY | FIRST_ NAME | LAST_ NAME | ADDRESS_ RESIDENCE | CITY_ RESIDENCE | COUNTRY_ RESIDENCE | DATE_OF_ BIRTH | MARITAL_ STATUS | GENDER | VALID_ FROM | VALID_TO |
|---|---|---|---|---|---|---|---|---|---|---|---|
| 1 | 30983290067 | Mirko | Vladovic | 5 Brda | Split | Croatia | 09/03/83 | N | M | 01/01/00 | 12/31/99 |
| 2 | 123123435455 | John | Smith | 57 Street | New York | USA | 07/03/73 | N | M | 01/01/00 | 12/31/99 |
| 3 | 123123435232 | Ivan | Vasiljevic | 7 Plosad | Moscow | Russia | 01/02/93 | N | M | 01/01/00 | 12/31/99 |
| 4 | 122999323237 | Helen | Grant | 12 Waterloo road | London | UK | 03/03/53 | N | F | 01/01/00 | 12/31/99 |
| 5 | 53566232322 | Helen | Felder | 2 Gasse | Berlin | Germany | 01/03/81 | Y | F | 01/01/00 | 12/31/99 |
| 6 | 831232131120 | Sara | Schubert | 3 Gasse | Frankfurt | Germany | 09/03/03 | N | F | 01/01/00 | 12/31/99 |
| 7 | 934230842030 | Samuel | Little | 27 Street | San Francisco | USA | 09/30/68 | Y | M | 01/01/00 | 12/31/99 |
| 8 | 198763111222 | Jannet | Nolte | 29 Street | New York | USA | 10/21/62 | N | F | 01/01/00 | 12/31/99 |
| 9 | 832378872030 | Margareth | Teacher | 2 Street | Boston | USA | 11/01/98 | N | F | 01/01/00 | 12/31/99 |
| 10 | 921318422030 | Ivan | Ivanovic | 9 Plosad | Vladivostok | Russia | 12/03/57 | N | M | 01/01/00 | 12/31/99 |
Now suppose that we get the delta of data in the current data load:
| CUST_ NATURAL_KEY | FIRST_ NAME | LAST_ NAME | ADDRESS_ RESIDENCE | CITY_ RESIDENCE | COUNTRY_ RESIDENCE | DATE_ OF_BIRTH | MARITAL_ STATUS | GENDER |
|---|---|---|---|---|---|---|---|---|
| 198763111222 | Jannet | Nolte | 27 Street | New York | USA | 10/21/62 | N | F |
| 832378872030 | Margareth | Smith | 2 Street | Boston | USA | 11/01/98 | Y | F |
| 921318422030 | Ivan | Ivanovic | 21 Cirk | Kazan | Russia | 12/03/57 | N | M |
In the delta data, we see that Jannet moved to a new address in the same city, Margareth got married and changed her last name, and Ivan moved to a new city.
So we need our data to display historical data up to a set point in time (captured with the date_from and date_to fields). In our case, this is the time of the load.
We will break the action into two parts: inserting the new and updating the old. First we insert the new data (if any table constraints hinder this, they must be disabled in the ETL process):
insert into dim_customer
 (select 11, '198763111222', 'Jannet', 'Nolte', '27 Street',
    'New York','USA',to_date('21.10.1962','dd.mm.yyyy'),'N','F',
     to_date('01.10.2016','dd.mm.yyyy'),to_date('31.12.9999','dd.mm.yyyy')
  from dual
 union
  select 12,'832378872030','Margareth','Smith','2 Street',
    'Boston','USA',to_date('01.11.1998','dd.mm.yyyy'),'Y','F' ,
    to_date('01.10.2016','dd.mm.yyyy'),to_date('31.12.9999','dd.mm.yyyy')
  from dual
 union
   select 13,'921318422030','Ivan','Ivanovic','21 Cirk',
     'Kazan','Russia',to_date('03.12.1957','dd.mm.yyyy'),'N','M' ,
     to_date('01.10.2016','dd.mm.yyyy'),to_date('31.12.9999','dd.mm.yyyy')
   from dual);
The new rows are now contained in the table with the old data:
| ID | CUST_ NATURAL_KEY | FIRST_ NAME | LAST_ NAME | ADDRESS_ RESIDENCE | CITY_ RESIDENCE | MARITAL_ STATUS | VALID_ FROM | VALID_TO |
|---|---|---|---|---|---|---|---|---|
| 8 | 198763111222 | Jannet | Nolte | 29 Street | New York | N | 01/01/00 | 12/31/99 |
| 11 | 198763111222 | Jannet | Nolte | 27 Street | New York | N | 10/01/16 | 12/31/99 |
| 9 | 832378872030 | Margareth | Teacher | 2 Street | Boston | N | 01/01/00 | 12/31/99 |
| 12 | 832378872030 | Margareth | Smith | 2 Street | Boston | Y | 10/01/16 | 12/31/99 |
| 10 | 921318422030 | Ivan | Ivanovic | 9 Plosad | Vladivostok | N | 01/01/00 | 12/31/99 |
| 13 | 921318422030 | Ivan | Ivanovic | 21 Cirk | Kazan | N | 10/01/16 | 12/31/99 |
Note that each new row defined by the natural key has a valid_from value of “10-01-16”. This is the ETL load date from which we consider the row valid.
Now we update the old date by closing the relevant records. As you see, the old rows with the ID values of “8”,”9”,and “10” need to be closed. We do this with by inputting a valid_to date that corresponds with the new rows’ valid_from date. This happens with help from SQL analytical functions:
UPDATE dim_customer dc
SET (valid_to) =
  (SELECT
     l_v
   FROM
     (SELECT
        cust_natural_key,
        valid_from,
        lead(valid_from,1,valid_to)
            over (partition BY cust_natural_key order by valid_from) l_v
      FROM dim_customer) dc_i
   WHERE dc.cust_natural_key = dc_i.cust_natural_key
   AND dc.valid_from         = dc_i.valid_from)
Note: The above algorithm updates the entire dim_customer table. It is sometimes wise to filter the changed rows in a separate table or use a MERGE statement.
After the update statement, this data is returned:
| ID | CUST_ NATURAL_KEY | FIRST_ NAME | LAST_ NAME | ADDRESS_ RESIDENCE | CITY_ RESIDENCE | MARITAL_ STATUS | VALID_ FROM | VALID_ TO |
|---|---|---|---|---|---|---|---|---|
| 8 | 198763111222 | Jannet | Nolte | 29 Street | New York | N | 01/01/00 | 10/01/16 |
| 11 | 198763111222 | Jannet | Nolte | 27 Street | New York | N | 10/01/16 | 12/31/99 |
| 9 | 832378872030 | Margareth | Teacher | 2 Street | Boston | N | 01/01/00 | 10/01/16 |
| 12 | 832378872030 | Margareth | Smith | 2 Street | Boston | Y | 10/01/16 | 12/31/99 |
| 10 | 921318422030 | Ivan | Ivanovic | 9 Plosad | Vladivostok | N | 01/01/00 | 10/01/16 |
| 13 | 921318422030 | Ivan | Ivanovic | 21 Cirk | Kazan | N | 10/01/16 | 12/31/99 |
There are other ways to implement the closing of Type 2 dimensions in data warehousing. Why not do a little experimentation and see what you can come up with on your own?
4. Fact Table Period Merges
One of the interesting problems we encounter in data warehousing is the period merge. This is needed when an event has multiple time periods and we need to construct one overlaying time period.
Let’s explain this using a simple example. Say a client has a couple of loan accounts and he is late with some of the payments. If we want to find out the time period in which the client is late, we need a period merge.

Picture 3: Simple merge
So if we look at the picture above, we see that the period in which the client was late with his payments was between January 1 and October 1.
Of course, a client can have many accounts that have a complex interrelationship. The following picture shows this:

Picture 4: Complex merge
Note: The period of December 1, 2016 to February 1, 2017 is not merged because it does not intersect with any other periods.
Next, we will look at a brief model that demonstrates the SQL needed for a period merge:
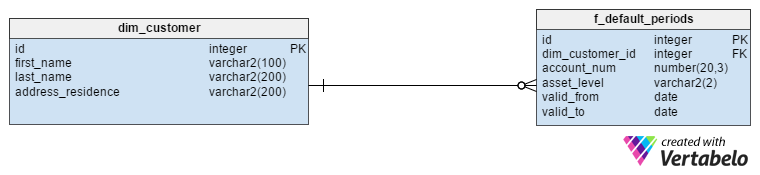
The data from f_default_periods is the shown here:
| ID | DIM_CUSTOMER_ID | ACCOUNT_NUM | ASSET_LEVEL | VALID_FROM | VALID_TO |
|---|---|---|---|---|---|
| 1 | 9000 | 1000 | D | 01/01/16 | 08/01/16 |
| 2 | 9000 | 1001 | D | 03/01/16 | 10/01/16 |
| 3 | 9000 | 1002 | D | 02/01/16 | 06/01/16 |
| 4 | 9000 | 1003 | D | 07/01/16 | 11/01/16 |
| 5 | 9000 | 1004 | D | 12/01/16 | 02/01/17 |
select
  dim_customer_id,
  valid_from,
  valid_to,
  lag (valid_to,1,valid_to)
    over (partition by dim_customer_id order by valid_to) l_valid_to
from f_default_periods
where asset_level ='D'
order by valid_to;
To clarify, we will partition the SQL code into five steps. Step one, shown below, uses a simple LAG function on the SQL statement:
We are only looking at periods in which the account is in default. We identify these periods using the clause WHERE asset_level = “D”.
And we get this data set:
| DIM_CUSTOMER_ID | VALID_FROM | VALID_TO | L_VALID_TO |
|---|---|---|---|
| 9000 | 02/01/16 | 06/01/16 | 06/01/16 |
| 9000 | 01/01/16 | 08/01/16 | 06/01/16 |
| 9000 | 03/01/16 | 10/01/16 | 08/01/16 |
| 9000 | 07/01/16 | 11/01/16 | 10/01/16 |
| 9000 | 12/01/16 | 02/01/17 | 11/01/16 |
In part two, we use a running max of the l_valid_to data:
with part_one as (
  select
    dim_customer_id,
    valid_from,
    valid_to,
    lag (valid_to,1,valid_to)
       over (partition by dim_customer_id order by valid_to) l_valid_to
  from f_default_periods
  where asset_level ='D')

select
  dim_customer_id,
  valid_from,
  valid_to,
  max(l_valid_to) over (partition by dim_customer_id order by valid_to) running_max
from part_one
order by valid_to;
We are laying the groundwork to identify any gaps in our time period.
| DIM_CUSTOMER_ID | VALID_FROM | VALID_TO | RUNNING_MAX |
|---|---|---|---|
| 9000 | 02/01/16 | 06/01/16 | 06/01/16 |
| 9000 | 01/01/16 | 08/01/16 | 06/01/16 |
| 9000 | 03/01/16 | 10/01/16 | 08/01/16 |
| 9000 | 07/01/16 | 11/01/16 | 10/01/16 |
| 9000 | 12/01/16 | 02/01/17 | 11/01/16 |
If we see that the running_max value is lower than the current valid_from value, we know that we have formed one merged group. And we can apply the previous “snapshot to Type 2” algorithm.
In part three, we flag the groups:
with part_one as (
  select
    dim_customer_id,
    valid_from,
    valid_to,
    lag (valid_to, 1, valid_to)
        over (partition by dim_customer_id order by valid_to) l_valid_to
   from f_default_periods
   where asset_level ='D'),

part_two as (
  select
    dim_customer_id,
    valid_from,
    valid_to,
    max(l_valid_to) over (partition by dim_customer_id order by valid_to) running_max
  from part_one)
select
  dim_customer_id,
  valid_from,
  valid_to,
  running_max,
  case when running_max >= valid_from then 0 else 1 end flag_gap
from part_two
order by valid_to ;
The data in this step is:
| DIM_CUSTOMER_ID | VALID_FROM | VALID_TO | RUNNING_MAX | FLAG_GAP |
|---|---|---|---|---|
| 9000 | 02/01/16 | 06/01/16 | 06/01/16 | 0 |
| 9000 | 01/01/16 | 08/01/16 | 06/01/16 | 0 |
| 9000 | 03/01/16 | 10/01/16 | 08/01/16 | 0 |
| 9000 | 07/01/16 | 11/01/16 | 10/01/16 | 0 |
| 9000 | 12/01/16 | 02/01/17 | 11/01/16 | 1 |
In part four, we apply the running_max sum to the flag_gap, just as in the previous algorithm:
with part_one as (
  select
    dim_customer_id,
    valid_from,
    valid_to,
    lag (valid_to,1,valid_to )
      over (partition by dim_customer_id order by valid_to) l_valid_to
  from f_default_periods
  where asset_level ='D'),
part_two as (
  select
    dim_customer_id,
    valid_from,
    valid_to,
    max(l_valid_to) over (partition by dim_customer_id order by valid_to) running_max
  from part_one),
part_three as (
  select
    dim_customer_id,
    valid_from,
    valid_to,
    running_max,
    case when running_max >= valid_from then 0 else 1 end flag_gap
from part_two)
select
  dim_customer_id,
  valid_from,
  valid_to,sum(flag_gap) over (partition by dim_customer_id order by valid_from) run_flag_gap
from part_three
order by valid_to;
In this step, the data is the same as in the previous step because we only have two merge groups:
| DIM_CUSTOMER_ID | VALID_FROM | VALID_TO | RUN_FLAG_GAP |
|---|---|---|---|
| 9000 | 02/01/16 | 06/01/16 | 0 |
| 9000 | 01/01/16 | 08/01/16 | 0 |
| 9000 | 03/01/16 | 10/01/16 | 0 |
| 9000 | 07/01/16 | 11/01/16 | 0 |
| 9000 | 12/01/16 | 02/01/17 | 1 |
Finally, in the fifth and final step we simply aggregate the data and get the time periods of the merged groups:
with part_one as (
  select
    dim_customer_id,
    valid_from,
    valid_to,
    lag (valid_to,1,valid_to )
         over (partition by dim_customer_id order by valid_to) l_valid_to
  from f_default_periods
  where asset_level ='D'),

part_two as (
  select
    dim_customer_id,
    valid_from,
    valid_to,
    max(l_valid_to)
       over (partition by dim_customer_id order by valid_to) running_max
  from part_one),

part_three as (
  select
    dim_customer_id,
    valid_from,
    valid_to,
    running_max,
    case when running_max >= valid_from then 0 else 1 end flag_gap
  from part_two),

part_four as (
  select
    dim_customer_id,
    valid_from,
    valid_to,
    sum(flag_gap) over (partition by dim_customer_id order by valid_from) run_flag_gap
from part_three)

select
  dim_customer_id,
  min(valid_from) valid_from,
  max(valid_to) valid_to
from part_four
group by dim_customer_id, run_flag_gap
order by valid_to ;
The final result data shows our two merged periods:
| DIM_CUSTOMER_ID | VALID_FROM | VALID_TO |
|---|---|---|
| 9000 | 01/01/16 | 11/01/16 |
| 9000 | 12/01/16 | 02/01/17 |
This algorithm was a little bit tricky! But I am sure that once you master it, it will give you the foundation to come up with something exciting on your own.
Build Your Own SQL Algorithms
In this post, we saw some common SQL algorithms used to work with batch data. We started with something simple and built up to more complex statements. As you observed with the snapshot to Type 2 and period merge use cases, SQL algorithms can and often do build on each other. I encourage you to create something on your own, and in pure SQL. The language has all the strength – not to mention beauty – to meet any data manipulation need. And when you do come up with something, share it in the comments section below!
